Таблицы на уведомление для сайта uCoz | |
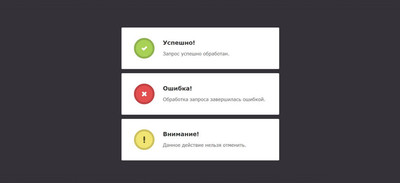
| Вашему вниманию приятные по своему дизайн и стилистике, а также простые таблички. Где у них поставлена кнопка и описание действие. Состоят из иконок и текста уведомления для пользователя на сайте, вообщем идут как информационные. Легко настраиваемые, можно изменить цвет и размер, текст, а так же и иконку. Еще одни очень важный момент для веб мастера - то, что они полностью адаптивные под мобильные устройства. Сами они выдержанны в светлой гамме цвета, что здесь нужно понимать, что подойдут на аналогичную гамму портала. Переходим к основной установке. 1. Вставляем код в CSS: Код .containern { margin: 40px auto; width: 380px; } .containern .notif { margin: 10px 0; } .notif { position: relative; padding: 25px 30px 25px 100px; min-height: 50px; line-height: 22px; background: white; border-radius: 2px; } .notif:before { content: ''; position: absolute; top: 25px; left: 30px; width: 40px; height: 40px; border: 5px solid; border-radius: 25px; } .notif p { font-size: 11px; color: #666; } .notif-title { margin: 0 0 5px; font-size: 14px; font-weight: bold; color: #333; } .notif-title:before, .notif-title:after { content: ''; position: absolute; background: white; border-radius: 2px; } .notif-notice:before { background: #a7d155; border-color: #8fb14f; } .notif-notice .notif-title:before, .notif-notice .notif-title:after { top: 44px; left: 55px; width: 4px; height: 12px; -webkit-transform: rotate(45deg); -moz-transform: rotate(45deg); -ms-transform: rotate(45deg); -o-transform: rotate(45deg); transform: rotate(45deg); } .notif-notice .notif-title:after { top: 50px; left: 48px; width: 8px; height: 4px; } .notif-alert:before { background: #e34f4f; border-color: #c14343; } .notif-alert .notif-title:before, .notif-alert .notif-title:after { top: 43px; left: 53px; width: 4px; height: 14px; -webkit-transform: rotate(45deg); -moz-transform: rotate(45deg); -ms-transform: rotate(45deg); -o-transform: rotate(45deg); transform: rotate(45deg); } .notif-alert .notif-title:after { top: 48px; left: 48px; width: 14px; height: 4px; } .notif-warn:before { background: #f1e472; border-color: #cec260; } .notif-warn .notif-title:before, .notif-warn .notif-title:after { top: 42px; left: 53px; width: 4px; height: 11px; background: #5c562b; } .notif-warn .notif-title:after { top: 54px; height: 4px; } .notif-minimize:before { content: ''; position: absolute; top: 11px; left: 4px; width: 7px; height: 2px; background: #bbb; } 2. Вставляем код в нужное вам место: Код <div class="containern"> <section class="notif notif-notice"> <h6 class="notif-title">Успешно!</h6> <p>Запрос успешно обработан.</p> </section> <section class="notif notif-alert"> <h6 class="notif-title">Ошибка!</h6> <p>Обработка запроса завершилась ошибкой.</p> </section> <section class="notif notif-warn"> <h6 class="notif-title">Внимание!</h6> <p>Данное действие нельзя отменить.</p> </section> </div> Если же вам нужна только одна табличка: Код <div class="containern"> <section class="notif notif-notice"> <h6 class="notif-title">Успешно!</h6> <p>Запрос успешно обработан.</p></section> </div> Код <div class="containern"> <section class="notif notif-alert"> <h6 class="notif-title">Ошибка!</h6> <p>Обработка запроса завершилась ошибкой.</p> </section> </div> Код <div class="containern"> <section class="notif notif-warn"> <h6 class="notif-title">Внимание!</h6> <p>Данное действие нельзя отменить.</p> </section> </div> Спасибо за внимание! Источник: uON.ucoz.com | |
Поделиться в социальных сетях
Материал разместил
| Комментарии: 8 | |
|
| |


