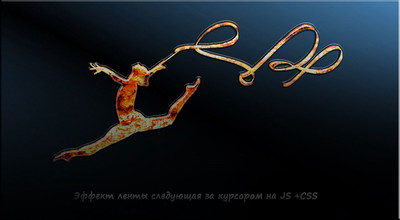
Эффект ленты следующая за курсором в JS | |
| Оригинальный эффект ленты, что идет с изменение в плане оттенка цвета, и которая сделана с помощью JS, где будет движение за курсором на сайте. Это безусловно не новый скрипт, а просто продолжение вариации, ведь можно наблюдать разные предметы, которые могут двигаться за курсором, и в последствии исчезать. И данный скрипт не исключение, но об безусловно более стильный по своей подачи, так как видим ленту, что меняет оттенок цвета. Не забываем, что все настраивается, так как сама лента кому-то может показаться широкой, а другому более тонкой, и как раз под это написан код, где выставляет данные, которые вас будут устраивать. Насчет ленты, здесь идет копия от спортивной гимнастики, где вы ведете курсор, и просто завороженно развивается лента, где автоматически меняется палитра цвета. Подойдет как под саму спортивную тематику, так и на любую площадку, ведь красиво выглядит. Установка: HTML Код <canvas id="kashca_lentochka"></canvas> CSS Код #kashca_lentochka { user-select: none; width: 100%; height: 488px; background-color: #141414; background-image: url(https://rataku.com/images/2022/08/11/depositphotos_300872276-stock-illustration-rhythmic-gymnastics-silhouette-of-a.jpg); background-size: cover; background-position: 50% 50%; margin: 18px 0; } @media (max-width: 768px) { #kashca_lentochka { height: 300px; } } JS Код window.requestAnimationFrame = window.requestAnimationFrame || window.webkitRequestAnimationFrame || window.mozRequestAnimationFrame || window.msRequestAnimationFrame || function(callback) { setTimeout(callback, 1000 / 60); }; var get = document.querySelector.bind(document), on = document.addEventListener.bind(document), container = document.querySelector('.kashca_lentochka-container'), context, canvas, mouseX, mouseY, px, py, points = [], size = 0, red = 0, green = 255, blue = 255, spread, SPEED_X = 0.15, SPEED_Y = 0.15, MAX_LENGTH = 120, RED_STEP = 0.02, GREEN_STEP = 0.015, BLUE_STEP = 0.025; function Point(x, y, dx, dy, size, color) { this.x = x; this.y = y; this.dx = dx; this.dy = dy; this.size = size; this.color = color; } Point.prototype.spread = function() { this.x += this.dx; this.y += this.dy; }; function drawLines() { var p0, p1, p2, total = points.length; for (var i = total - 1; i > 1; i--) { p0 = points[i]; p1 = points[i - 1]; p2 = points[i - 2]; context.beginPath(); context.strokeStyle = p0.color; context.lineWidth = p0.size; context.globalAlpha = i / total; context.moveTo((p1.x + p0.x) / 2, (p1.y + p0.y) / 2); context.quadraticCurveTo(p1.x, p1.y, (p1.x + p2.x) / 2, (p1.y + p2.y) / 2); context.stroke(); p0.spread(); } points[0].spread(); points[total - 1].spread(); } function draw() { // Движение линии var dx = (mouseX - px) * SPEED_X, dy = (mouseY - py) * SPEED_Y; // Ограничьте количество движений if (dx < -spread) { dx = -spread; } else if (dx > spread) { dx = spread; } if (dy < -spread) { dy = -spread; } else if (dy > spread) { dy = spread; } // Сохранить положение мыши px = mouseX; py = mouseY; // Создать новую точку на линии points.push(new Point( px, py, dx, dy, Math.abs(Math.sin(size += 0.125) * 10) + 1, 'rgb(' + (Math.floor(Math.sin(red += RED_STEP) * 128 + 128)) + ',' + (Math.floor(Math.sin(green += GREEN_STEP) * 128 + 128)) + ',' + (Math.floor(Math.sin(blue += BLUE_STEP) * 128 + 128)) + ')' )); if (points.length > MAX_LENGTH) points.shift(); context.clearRect(0, 0, canvas.width, canvas.height); context.globalCompositeOperation = 'lighter'; drawLines(); drawLines(); drawLines(); } function update() { requestAnimationFrame(update); draw(); } function resize() { canvas.width = canvas.offsetWidth; canvas.height = canvas.offsetHeight; } function init() { canvas = get('#kashca_lentochka'); context = canvas.getContext('2d'); canvas.onmousemove = function(event) { mouseX = event.clientX - canvas.getBoundingClientRect().left; mouseY = event.clientY - canvas.getBoundingClientRect().top; }; document.onmouseenter = function(event) { mouseX = event.clientX - canvas.getBoundingClientRect().left; mouseY = event.clientY - canvas.getBoundingClientRect().top; for (var i = points.length; i--; ) { points[i].x = mouseX; points[i].y = mouseY; } }; canvas.ontouchmove = function(event) { mouseX = event.targetTouches[0].clientX - canvas.getBoundingClientRect().left; mouseY = event.targetTouches[0].clientY - canvas.getBoundingClientRect().top; spread = 1; }; canvas.ontouchstart = function(event) { spread = 0; mouseX = event.targetTouches[0].clientX - canvas.getBoundingClientRect().left; mouseY = event.targetTouches[0].clientY - canvas.getBoundingClientRect().top; for (var i = points.length; i--; ) { points[i].x = mouseX; points[i].y = mouseY; } if (!event.target.href) { event.preventDefault(); } }; window.onresize = resize; resize(); mouseX = canvas.width / 2; mouseY = canvas.height / 2; update(); } on('DOMContentLoaded', init); Само основное движение задействовано средствами JS, где также присутствует область canvas, и по этой причине, здесь не нужно задействовать различных библиотек, чисто на скрипте все вывозит. Демонстрация Источник: atuin.ru | |
Поделиться в социальных сетях
Материал разместил
| Комментарии: 1 | |
|
| |

